Tuesday 29 July 2014

seeded Metadata Services (MDS) in ADF - environment preparation, proof of concept

It is time to make the proof of concept that'll show if it really works. As it has been mentioned in the introduction, seeded customizations are divided to layers and values. One layer groups one or more values, for example you can define layer for each departament and user roles for its values. For that example i'll provide only one myCustLayer with two values: first, second.

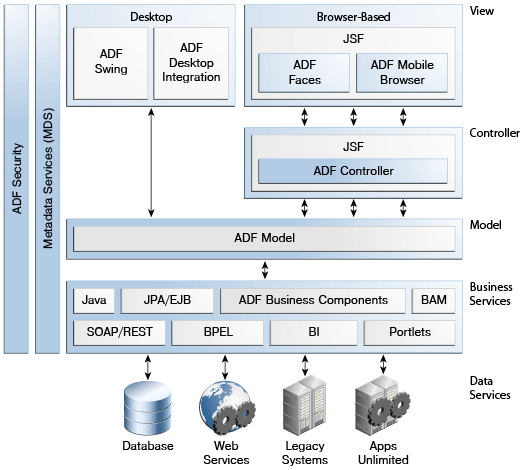
Please create SeededMdsDemoApp basing on Fusion Web Application template. Go through wizard without any changes.


Right click on Model project and remove it.


Add new generic project named CcProject.


Right click on it, go to Project Properties. Select Libraries and Classpath and click on Add Library button. Select MDS Runtime and click OK to confirm changes.


Create new Java class that extends oracle.mds.cust.CustomizationClass.


As you can see, you have got three methods to implement.


Right click on CcProject in Application Navigator section, select Deploy and New Deployment Profile. Please use ADF Library JAR file.


Confirm all and deploy project to JAR file using the defined profile.


Now the tricky part. JDeveloper needs to have definition of the layer in its own configuration. The reason that customization class is in separate project is to put JAR file to JDev's classpath. Please put it to <jdeveloper_home>\jdev\lib\patches. The layers must be visible for the IDE, therefore please open <jdeveloper_home>\jdev\CustomizationLayerValues.xml file and add this code:

  <cust-layer name="myCustLayer" id-prefix="mcl">
    <cust-layer-value value="first" display-name="layer one" id-prefix="1"/>
    <cust-layer-value value="second" display-name="layer two" id-prefix="2"/>
  </cust-layer>

In Application Navigator right click on ViewController project, pick Project Properties and go to Dependencies. Please remove Model dependency and add dependency to CcProject.


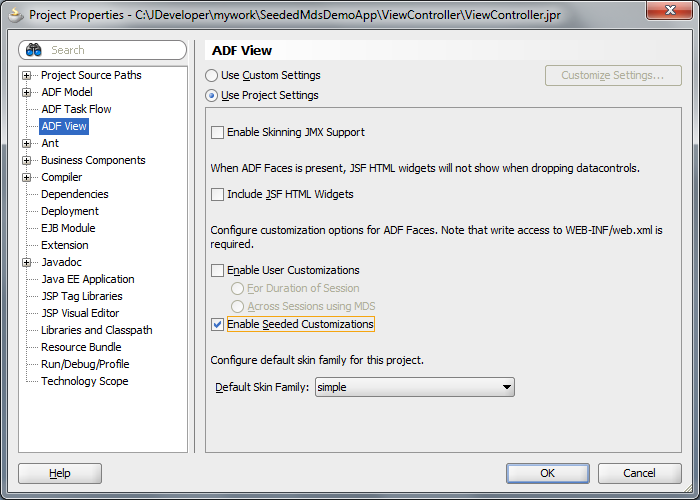
MDS must be enabled for the project, please select ADF View node, and check Enable Seeded Customizations option.


In Application Navigator please expand Application Resources section, go to Descriptors, ADF META-INF and double click on adf-config.xml file. Select MDS Configuration tab, click on green plus icon in the top right corner and search for MyCC class. Confirm changes.


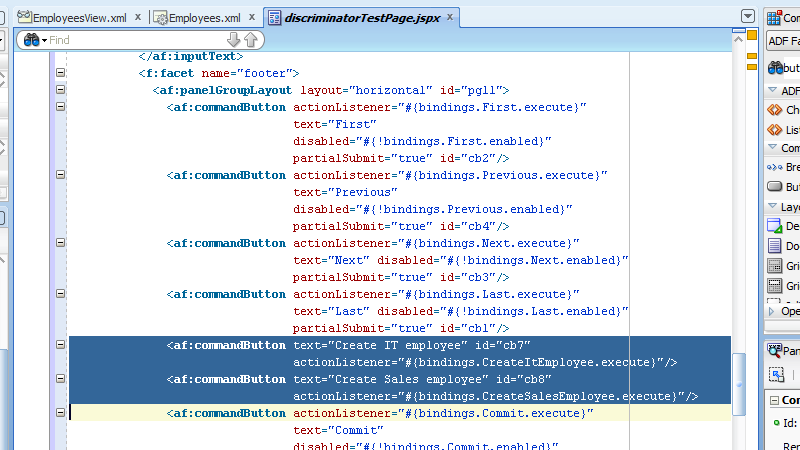
Create new JSPX file in the ViewController project. Add few output text components.


Save all and restart JDeveloper. During next run please select Customization Developer role.


Please check Application Navigator nodes. Some files has got lock icon on them, that means they aren't customizable.


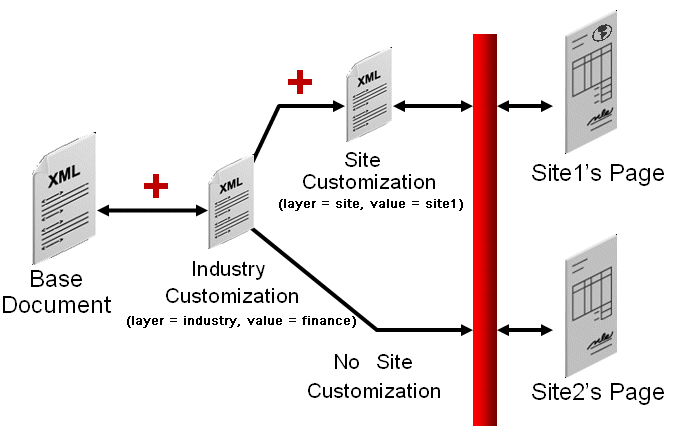
There is additional panel called Customization Context. At the time you can see the file without any customizations or you can select layer and value that you want to change.


For this example first layer will hide "Layer 2" output text - click on the node and change rendered attribute to false in Property Inspector. Do similar work for second layer and "Layer 1" label.

The layer and its value will be evaluated during each request (please check getCacheHint method in the MyCC class). Value changes every each second so to verify result you must refresh page after a second.

Please run and check the example.

Thursday 24 July 2014

few words about MDS in ADF - introduction


MDS or Metadata Services is very complex mechanism designed for customizations. For newbies I'm used to compare it to XSLT. Oracle ADF is more or less a set of XML files. Each XML has its own XSD scheme, each node has its own meaning and the XML nodes are in relation with another XML files. In example page fragments are in relation with their page definitions, but that part should be well known for ADF developers :) One quick look on ADF architecture:


image source: http://docs.oracle.com/middleware/1212/adf/ADFCG/intro.htm

The vertical bar with MDS label has been drawn across each layer! There must be something in it.

There are two types of MDS in ADF. First one is runtime. Users can implicitly to persist their "changes" to the application. An af:table wrapped in af:panelCollection contains 20 columns. User A needs for his work only five of them so he uses af:panelCollections feature to hide rest. User B has changed the size of the columns and so on. Such changes are saved in MDS runtime repository during the last phase of ADF-Faces lifecycle. I'll try to write a post about it in the future.

The second type is called seeded and i would like to spend a little bit more time about it. Seeded MDS is embedded with the application. You're able to find customization files in the deliverable package (EAR or WAR file) or in Metadata Archive (MAR) which could be delivered separately. While starting the JDeveloper, there is Customization Developer role. It is done similar to regular work of the ADF development team but with some constraints.


First thing that you must to be aware of is no Java development there. If you want to change method that handles ActionEvent, the bean and the method must be already developed. Customization role allows you to change only XML-based files excluding application descriptors like web.xml, weblogic.xml and so on. I haven't try to change them but i suppose that the customization won't applies to them. Second thing, JDeveloper supports changes only for ViewController projects. If you'll find a page to customize, probably you have found a taskflow that calls it. Also, you have got its page definition file. Mostly you'll do UI related changes like change a placeholder to customer's logo.

There is a picture in the documentation that put some more light to the description.

 image source: http://docs.oracle.com/cd/E16764_01/web.1111/b31974/img/layerdcust_ppt2.gif

In our deliverables we have got a JSF page (Base Document) and a collection of customizations divided to layers. Each layer could have more than one customizations. In the runtime framework checks if and which customizations should be applied to the page, applies them and produces an output. Site2 is the same as Base Document but Site1 differs. In the top right corner we have got an image.

But what if you want to change an entity? MDS is across all ADF layers... It is possible but you must to write customization file by your own. File must be put in the specific directory in the project. If you're adding an attribute or modify existing one it is not a big issue. The game begins when you must to remove an attribute. You must to find each view object that uses the entity, each application module that uses each of the view objects, each page definition that use the VOs and so on. Though? Sounds that it could be very though task to fulfill.

Now the most important question - what could be a business explanation for MDS? Maybe you have bought an application without source codes and the licence agreement disallows you to make changes in the deliverables. Or you have developed an application and sold it to thousands of customers. Each customer ask you about some changes like change the skin, hide some buttons, disclose a section by default and so on. It won't be nice to hardcode the client names and their business logic in the base source code. Also it won't be easy to maintain thousands of branches of the same application. It will be easier to have base application and customizations stored elsewhere but outside the base source code. If you have such problems, MDS is the answer. Fast to develope, without ifs or hardcodes in the base source code and easy to maintain.

Monday 21 July 2014

discriminator property in BC4J

On the previous project the data about persons and companies were stored in the same table. There was also a constraint on a column that allows to put 1 for a person and 2 for the company. Moreover, there was a nullable column to store first name, but for the person, the field mustn't be empty. And a lot of similar validations more. It sounds simple to code, but how to achieve this without putting ifs in each validation rule? Solution is also very simple. The main constraint column is the discriminator. And how to code it in ADF? In this post you'll find the abstract example of the discriminator property.

Assumptions:
  • we have got already created new fusion application (leave defaults)
  • there is defined one datasource connection to the HR demo schema
  • assumption above indicates that you have got also a local or remote database
Requirements
During analysis phase the model of the domain defines several independent entities which are extending one base (abstract) entity. They're all stored in the same table in the database. So they inherit validation constraints and these validations are common for each entity. But there is also a set of elements which differs these entities. Some elements are redundant and shouldn't be fulfilled (or fulfilled with defaults), other are mandatory.

Now let us put names to these requirements. A company is divided into departments. In each departments we have got employees, which are stored in EMPLOYEES table. We have got a set of common validation rules, generated from database constraints, such as lastname length validator (max 25 chars). To simplify the example, there are only IT and Sales departments with 1 and 2 value of DEPARTMENT_ID foreign key. Commission percentage value is mandatory for the Sales employees (in database this column is nullable). For IT department commission value couldn't be fulfilled.

Implementation
First of all we must to create mentioned base (abstract) entity object, so we must to create entity from the EMPLOYEES table. Because the project is new, i've picked option "Business Components from Tables". I've selected only EMPLOYEES table, created entity and editable VO for it. The common validation rules are generated automatically in the entity.

Now the most interesting thing - go to Employees entity and edit DepartmentId attribute. Please check the Discriminator checkbox and put the 2 for Sales department as a default value. To aviod validation problems in the future i've decided to set the updateable attribute to "while new" option.

 Now, after right click on the Emploees entity we can see "Create Extended Object". Click and proceed with the dialog. The example is for the IT employee.


Ok, IT employee is ready to be developed. We must set the discriminator value to 1. To do that the attribute must be overriden. Select DepartmentId, click Override button in the top right corner.


The discriminator attribute checkbox is disabled, but default value isn't. Change it to 1 (IT).


Now the commision attribute. First of all it must be also overriden. It shouldn't be editable, so Updateable option is set to Never. And the default commision value is set to 0.


The SalesEmployeesEx entity is created similar to the IT. Discriminator value is correct, don't change anything there. The commission value is mandatory - override the attribute and check Mandatory option.

There are two child entities based on Employees one. The framework needs to be notified which one should be used. Open EmployeesView view object and go to Entity Object tab. On the right above the selected entities section is Subtypes button.


Please click it and select two child entites created few steps before.


Save all and BC4J model is done.

Create new JSPX test page. Drag and drop the EmployeesView1 from the Data Conrols on the page as form with navigation controls. Select also Commit and Rollback operations to save or cancel the changes.

In page definition of the test page, click green plus icon above the binding section.


Action is already selected, proceed with the dialog. Select an EmployeesView1Iterator and Create with parameters operation from the second list. Change operation id to CreateItEmployee. Right click on the operation, and select Named Data from the Insert inside CreateItEmployee menu. Fulfill the NDName attribute with discriminator attribute name (DepartmentId), oracle.jbo.domain.Number is the NDType of the attribute and 1 is proper NDValue for the IT employee.

Do the same for creating Sales employee operation. Remember about the proper discriminator value.

After that the page definition structure should look like this:


On the JSPX file add two additional buttons to the page and bind them with this operations and change the text attribute to Create IT/Sales employee. Source code of the JSPX file should look more or less like this:


Finally, run the page and check how will it work. Please check differences between Sales and IT employees, how behave CommisionPct attribute.


For the IT ComissionPct is disabled with fixed default value 0.


As a homework i'll suggest to add range validation for salary attribute :)

Tuesday 15 July 2014

declarative components


One of my recent project was very look&feel oriented. Each text field, table, image (or complex combinantion of these elements) needed to be put into a box. Height of the box should be somehow unified across the application, the width may vary. The objective was to find the fastest solution to achieve that and also the most flexible one in case if the requirement change (i.e. globally change the height of the boxes). Well, CSS sounds nice, but i've simplified the requirements a little bit to justify usage of the declarative components.

Declarative components are reusable, composite User Interface (UI) components that comprise other existing Application Development Framework (ADF) Faces components.
(source: Oracle® Fusion Middleware Developer's Guide for Oracle SOA Suite)

Declarative components approach requires to split the work to two phases - the component itself and the application that uses it. So, let us start and create the component. In few simple steps we need to use wizards to create an application, put tag library name, its prefix and so on.


The content of the box will be filled using dedicated facet tag. For the test purposes, the name of the facet will be "body".

The Tag Library must be specified also. For demo purposes it looks like on the screenshot below.


Component will have two attributes - the label and the width. One of them will be mandatory.


At the end we have got an JSPX file.


To fulfill the requirements i've decided to use af:panelBox, af:panelGroupLayout and af:spacer to unify the height. Attributes are available using EL expression #{attrs}. To declare the facet i've used af:facetRef component by drag&drop it from Component Palette.


Quick screenshot of the source code...

Now the project must be exported as JAR file. Right click on the project name, lets leave defaults in the wizard.


The JAR file has been created.

First part of the job is done. Now lets test the component, so create another application.


In IDE Connections create new filesystem connection, point the deploy output directory from application with declarative component.


Right click on the JAR file and add it to the project.


Create JSPX test page and prepare sample layout for it.


Within Component Palette switch to MyDemoTagLib. You'll find there MyDemoComponent. Drag and drop it to the page. The wizard asks about fulfilling required attributes.


Please note that mandatory attribute needs to be fulfilled while dropping it onto a page. The design looks like this:


the source code of this example:


and, finally, the result of running page:

Field label also could be passed as an attribute or could be hidden by setting its simple attribute to true. The box could contain more than one component, i.e. an image, command button and table with several rows. But it is only an example :)